
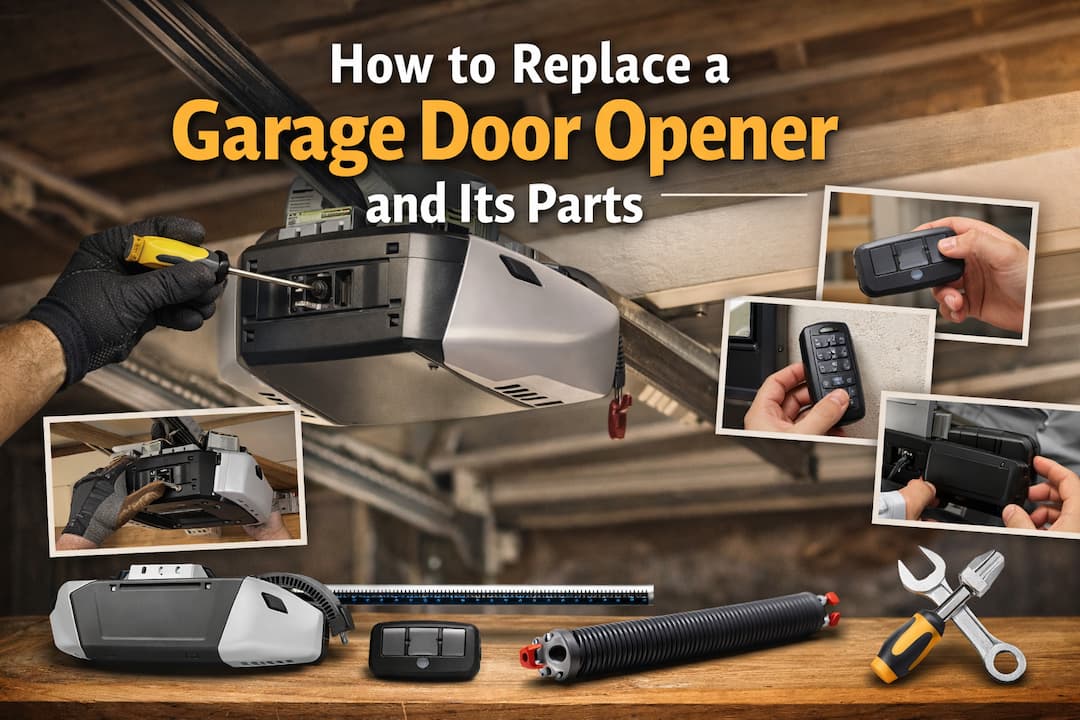
A properly functioning garage door opener is one of those conveniences we rarely think about — until it stops working. Whether you’re struggling with a door that won’t open, a remote that doesn’t respond, or strange grinding noises coming from the motor, knowing how to replace a garage door opener and its individual components can save you time, money, and frustration.
In this comprehensive guide, we’ll walk you through everything you need to know about garage door opener replacement — from diagnosing the problem to replacing specific parts like the remote, battery, keypad, motor, button, belt, and spring. We’ll also cover tips for popular brands like Chamberlain and Genie, and let you know when it’s time to call a professional.
Signs Your Garage Door Opener Needs Replacement
Before spending money on a new system, it’s important to recognize the warning signs that your garage door opener is failing. Here are the most common indicators:
- Door not opening or closing properly: If your garage door reverses unexpectedly, stops midway, or only opens partially, the opener may be malfunctioning.
- Remote or keypad not responding: When your remote or wall keypad fails to trigger the opener — even after replacing batteries — the receiver or logic board may be at fault.
- Loud or unusual noises: Grinding, rattling, or straining sounds during operation often signal worn gears, a failing motor, or a damaged belt or chain.
- Aging opener system: Most garage door openers last 10 to 15 years. Older models may lack modern safety features and become increasingly unreliable.
- Slow or inconsistent response times: If there’s a noticeable delay between pressing your remote and the door moving, the opener’s internal components may be wearing out.
Tools and Safety Tips Before Replacing an Opener
Basic Tools You Will Need
- Power drill and drill bits
- Adjustable wrench and socket set
- Ladder (6 to 8 feet)
- Voltage tester
- Wire stripper and connectors
- Screwdrivers (flathead and Phillips)
- Level
- Tape measure
Safety Precautions
⚠️ Always disconnect power to the garage door opener at the circuit breaker before beginning any installation or repair work. Failure to do so can result in serious injury or electrical shock.
- Never attempt to replace torsion springs without professional help — they are under extreme tension and can cause severe injuries.
- Keep children and pets away from the work area during installation.
- Read the manufacturer’s instructions included with your new opener or parts before starting.
- Use a sturdy, stable ladder and have a second person assist when mounting the rail or motor unit.
How to Replace a Garage Door Opener (Main Process)
Whether you’re upgrading to a smarter system or replacing a broken unit, here’s how to replace a garage door opener step by step.
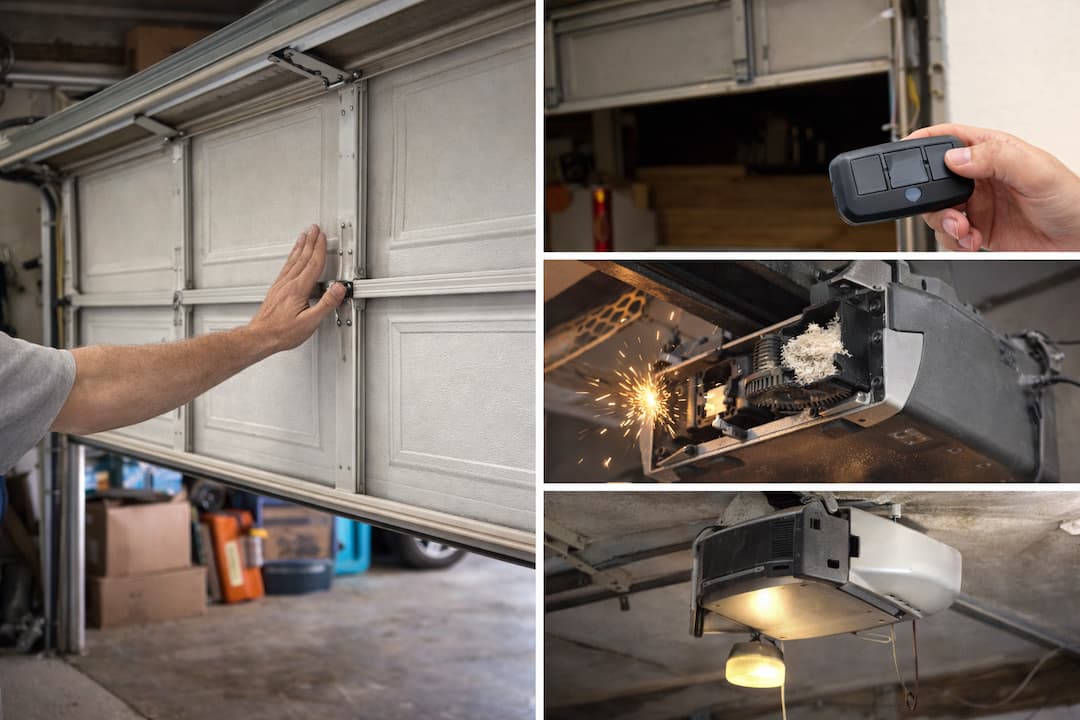
Step 1: Remove the Old Opener
- Pull the emergency release cord to disconnect the door from the opener.
- Disconnect the power cord and any wiring connected to the wall button and safety sensors.
- Remove the mounting brackets that attach the rail to the ceiling.
- Detach the drive assembly from the header bracket above the door.
- Lower and remove the entire unit carefully.
Step 2: Install the New Opener
- Assemble the new opener’s rail according to the manufacturer’s instructions.
- Attach the motor unit to the assembled rail.
- Mount the header bracket above the center of the garage door.
- Hang the rail from the ceiling using the provided mounting hardware. Use a level to ensure it’s straight.
- Connect the drive trolley to the garage door’s arm bracket.
- Wire the safety sensors near the floor on each side of the door frame.
- Connect the wall button wiring and plug in the unit.
Step 3: Test the System
- Program your remote and test open/close function.
- Adjust the travel limits and force settings as needed.
- Verify that the safety auto-reverse feature works by placing a 2×4 flat on the floor and closing the door — it should reverse on contact.
💡 Most modern openers come with a smartphone app for remote access. Take time to set this up for added convenience and security.
How to Replace a Garage Door Opener Remote
If your garage door remote is lost, broken, or simply not working, replacing it is usually straightforward.
Identifying Remote Issues
- Remote doesn’t respond even after replacing the battery — the remote may need reprogramming or replacing.
- Range is significantly reduced — internal antenna may be damaged.
- Buttons are stuck or unresponsive — physical damage to the remote circuit board.
Programming a New Remote
- Purchase a compatible replacement remote for your opener’s brand and model.
- Locate the ‘Learn’ button on your opener motor unit (usually on the back or side panel).
- Press and release the Learn button — the indicator light will turn on.
- Within 30 seconds, press and hold the button on the new remote until the opener’s light flashes or clicks.
- Test the remote from your driveway to confirm it works.
💡 Universal remotes are available for most openers if you can’t find a brand-specific replacement.
How to Replace a Garage Door Opener Battery
Many modern garage door openers include a backup battery that keeps the unit functioning during a power outage. When this battery starts to fail, you’ll notice warning indicators or reduced performance.
Signs the Backup Battery Is Failing
- The opener displays a battery warning light or error code.
- The door moves slowly or fails to operate during power outages.
- The battery has been in use for 1 to 2 years (typical lifespan).
How to Replace the Battery
- Locate the battery compartment — typically on the back or side of the motor unit.
- Open the compartment door and remove the old battery.
- Note the battery type (commonly a 12V sealed lead-acid or lithium battery).
- Insert the new battery, observing correct polarity (+ and -).
- Close the compartment and test the opener during a simulated power outage.
💡 For remote control batteries, most use CR2032 or AA batteries. Replace them annually or when range decreases noticeably.
How to Replace a Garage Door Opener Keypad
The exterior keypad allows you to enter your garage without a remote. When it stops working due to physical damage, weathering, or connectivity issues, replacing it is a simple DIY task.
Steps to Replace the Keypad
- Purchase a compatible keypad for your opener’s brand (Chamberlain, Genie, LiftMaster, etc.).
- Remove the old keypad from its mounting bracket by pressing the tabs on the bottom and pulling down.
- Install a fresh battery in the new keypad.
- Press the Learn button on the motor unit, then enter your desired PIN on the keypad and press Enter.
- Wait for the opener to click or flash, confirming the PIN is saved.
- Mount the new keypad on the wall bracket and test it.
⚠️ Choose a PIN that is not easily guessable. Avoid obvious sequences like ‘1234’ or your address number for security.
How to Replace a Garage Door Opener Motor
The motor is the heart of your garage door opener system. When it burns out or fails, the entire unit becomes inoperable. In many cases, replacing just the motor is more cost-effective than buying a brand-new opener.
Signs the Motor Is Worn Out
- The opener hums but the door doesn’t move.
- Burning smell during operation.
- Motor runs continuously without stopping.
- Visible damage to the motor unit or wiring.
Steps to Replace the Motor
- Disconnect power to the opener.
- Take a photo of all wire connections before disconnecting anything.
- Remove the motor housing cover and disconnect the wiring harness.
- Unscrew and remove the old motor.
- Insert the new motor and secure it with the mounting screws.
- Reconnect the wiring harness and replace the housing cover.
- Restore power and run a full cycle test.
💡 Always order the exact motor model compatible with your opener unit. Check the label on your motor housing for the model number.
How to Replace a Garage Door Opener Button
The wall-mounted button (or wall control panel) is used to operate the door from inside the garage. If your button is cracked, stuck, or shorting out, replacing it is a quick and inexpensive fix.
Steps to Replace the Wall Button
- Disconnect power to the opener at the breaker.
- Remove the old button from the wall by unscrewing it or pressing the release tabs.
- Note how the two wires are connected to the button terminals (white and white/red or two white wires).
- Disconnect the wires from the old button.
- Connect the wires to the new button’s terminals.
- Mount the button to the wall and restore power.
- Test the button to confirm proper operation.
How to Replace a Garage Door Opener Belt
Belt-drive openers are quieter than chain-drive models, making them popular for homes with living spaces above or adjacent to the garage. Over time, the belt can stretch, crack, or break.
Belt Drive vs. Chain Drive
Belt-drive systems use a rubber or fiberglass reinforced belt to move the trolley. Chain-drive systems use a metal chain, similar to a bicycle chain. If your opener uses a chain, the replacement process is similar but involves chain tensioning.
Steps to Replace the Belt
- Disconnect power and pull the emergency release cord.
- Loosen the tension adjustment nut on the rail to slacken the belt.
- Disconnect the belt from the trolley assembly.
- Slide the old belt off the drive sprocket and idler pulley.
- Thread the new belt around the drive sprocket and idler pulley.
- Reconnect the belt to the trolley and adjust the tension so there is about 1/2 inch of slack.
- Restore power and run a few open/close cycles to check belt alignment.
💡 Always use the manufacturer-recommended replacement belt for your specific opener model. An incorrect belt can damage the drive system.
How to Replace a Garage Door Opener Spring
Garage door springs are one of the most important — and most dangerous — components of your system. They counterbalance the weight of the door, allowing the opener to lift it with minimal effort.
Why Springs Are Critical
- Torsion springs (mounted above the door) and extension springs (mounted along the sides) are under massive tension.
- A broken spring means the opener motor has to carry the full weight of the door, leading to rapid motor failure.
- A snapped spring can cause serious injury or property damage if not handled carefully.
⚠️ Replacing garage door springs — especially torsion springs — is extremely dangerous and should almost always be performed by a trained professional. The springs can release hundreds of pounds of force instantly if mishandled.
When You Can DIY vs. When to Call a Pro
- Extension springs on lightweight single-car doors may be within reach of experienced DIYers using proper safety equipment.
- Torsion springs should always be handled by a certified garage door technician.
- If you’re unsure which type of spring you have, contact a professional.
💡 Regular spring maintenance — including lubrication with a silicone-based spray every 3 months — can extend spring life by years.
How to Replace Specific Brand Openers
How to Replace a Chamberlain Garage Door Opener
Chamberlain is one of the most trusted garage door opener brands in North America. Their lineup includes MyQ-enabled smart openers and heavy-duty models for larger doors.
- Chamberlain openers use the Security+ 2.0 rolling code technology, meaning you need a compatible remote or keypad when replacing components.
- The Learn button on Chamberlain units is typically yellow, purple, or orange depending on the model generation.
- When installing a new Chamberlain opener, connect it to the MyQ app for smart home integration and real-time monitoring.
- Chamberlain offers direct replacement parts — including motors, belts, and remotes — available at home improvement stores and online.
💡 Visit Chamberlain’s official website for model-specific installation videos and PDF manuals. Always match your new parts to your existing model number.
How to Replace a Genie Garage Door Opener
Genie is another leading brand known for durable, feature-rich openers. Their Intellicode technology provides secure rolling-code operation.
- Genie openers use Intellicode rolling code technology — when replacing a remote or keypad, you’ll need a Genie-compatible accessory.
- Genie’s Learn button is typically labeled and found on the back of the motor unit or inside the light cover.
- Genie offers a series of direct replacement parts and complete opener kits compatible with existing installation hardware.
- For Genie’s chain-drive models, inspect and lubricate the chain every 6 months for optimal performance.
💡 Genie’s Aladdin Connect add-on can upgrade older Genie openers to smart, Wi-Fi-enabled systems without replacing the entire unit.
When to Call a Professional
While many garage door opener repairs are DIY-friendly, some situations genuinely call for professional expertise:
- Spring replacement: As discussed, torsion spring replacement requires specialized tools and training. Never attempt this without professional help.
- Electrical issues: If you notice burning smells, sparks, or tripped breakers related to your opener, contact a licensed electrician or garage door technician.
- Structural damage: If the door panels, tracks, or cables are damaged, a professional assessment is needed before operating the door.
- Complex smart home integrations: If you’re integrating a new opener into an existing smart home system and encounter issues, a tech-savvy installer can ensure proper setup.
- Repeated failures: If your opener keeps breaking down despite multiple repairs, a professional can diagnose underlying issues you may have missed.
Garage Door Opener Services in OKC
If you’re in the Oklahoma City area and need reliable, professional garage door opener services in Okc, our team is here to help. Whether you need a simple part replacement or a full system installation, we offer:
- Complete garage door opener installation and replacement
- Remote, keypad, battery, and motor repair and replacement
- Spring replacement by certified technicians
- Routine maintenance and lubrication services
- Emergency same-day repair services in OKC
Hiring an expert saves you time, eliminates safety risks, and ensures your opener is installed correctly the first time. Our technicians are trained on all major brands including Chamberlain, Genie, LiftMaster, and more.
💡 Regular annual maintenance can extend the life of your garage door opener by 5 or more years. Contact us today to schedule a tune-up.
Conclusion
Knowing how to replace a garage door opener and its components is a valuable skill that can save you money and keep your home secure. Whether you’re swapping out a dead remote battery, programming a new keypad, or installing an entirely new opener, this guide has covered every major scenario you’re likely to encounter.
For complex repairs — especially spring replacement or electrical problems — don’t hesitate to reach out to a certified garage door professional. If you’re in the OKC area, our team is ready to help with fast, reliable, and affordable garage door opener services.
Frequently Asked Questions
How long do garage door openers last?
Most garage door openers last between 10 and 15 years with regular maintenance. Higher-end models with quality motors and belt drives can sometimes exceed 15 years. Factors like frequency of use, climate, and maintenance habits all affect lifespan.
Can I replace a garage door opener myself?
Yes, replacing a garage door opener is a manageable DIY project for most homeowners with basic mechanical skills and the right tools. However, certain repairs — particularly spring replacement and electrical issues — should be left to professionals for safety reasons.
How much does it cost to replace a garage door opener?
The cost varies depending on the type and features of the opener. Basic chain-drive units typically cost between $150 and $300. Belt-drive or smart Wi-Fi-enabled openers can range from $250 to $600 or more. Professional installation adds $100 to $300 depending on your region and the complexity of the job.
Why is my garage door opener not working?
There are several common causes: dead remote batteries, a tripped circuit breaker, misaligned safety sensors, a disconnected power cord, or a locked-out control panel. Start with the simplest fixes first — check the power source and replace the remote battery. If the problem persists, inspect the safety sensors and review the error code on the opener’s display if available.